Applesauce!

Applesauce! Not just 1920’s slang to express disbelief, it’s also a delicious, inexpensive, and delightfully old-fashioned way of rounding out a meal.  You can also use it to replace (some) fat in baked goods, which is handy. Commercial applesauce is not expensive, so this isn’t necessarily a case of saving money via DIY. I do think it’s cheaper to make your own organic, though. And I like supporting local farms when I can.

A couple of weeks ago, I made a bunch of applesauce. I headed down to the Glenwood Sunday Market to pick up a bushel of apples seconds from Earth First Farms. Earth First is an organic orchard in Southwest Michigan. They had a nice price on seconds–apples that aren’t pretty enough for regular sale, but are still plenty useful. I hauled my bushel home, and began a mad afternoon of applesaucing.

Applesauce is a good beginner canning project, as it does not require much special equipment and the process is simple. Over the years, I have acquired some equipment that definitely makes large scale projects simpler, but it’s not strictly necessary.

Of course, you don’t have to make a bushel’s worth of sauce, and you don’t need to can it. You can just make enough to enjoy as a side dish, if you’d rather.  The directions are the same, whether you’re making a bowl or a bushel.


You will need:

  • Apples. I used Jonathans, but you can use whatever kind you like, or a mixture.
  • A big kettle to cook the apples in.
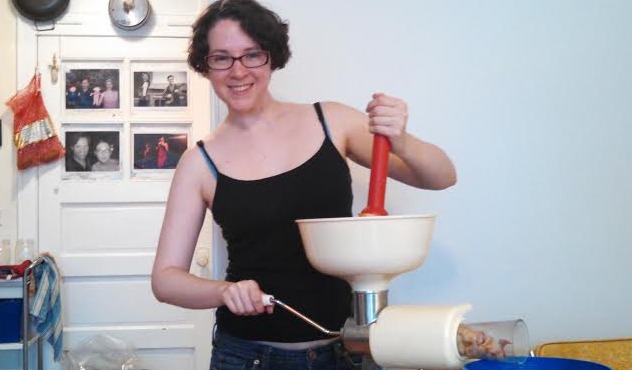
  • Something with which to squish the apples. I use a foodstrainer-saucemaking-great big cranky thing, but you can use a hand held food mill, or, if you are really dedicated (I’m not) squish your apples through a sieve. Do not make a bushel’s worth of sauce if you plan to use a sieve. This way madness lies.
  • You can use sugar. I don’t.
  • Water for cooking the apples.

If you are canning the sauce, you will need.

  • Canning jars. You can get these at the hardware store, or in the seasonal section of your grocery store. These can be reused.
  • Canning lids. You have to use brand new lids every single time. Every. Single. Time.
  • Canning bands. These are metal bands that hold the lids on during processing.
  • A big kettle. Really big. A canner is ideal, for obvious reasons. However, you can use a giant pot if you can figure out some way to keep the jars off the bottom.
  • A jar lifter. These are insulated tongs that are shaped to pick up jars. They are not expensive, and I have used them ever since my dad bought me one for Christmas, after fielding a phone call during a canning session in which I said, “I dropped a jar using barbeque tongs and splashed myself in the face with boiling water. What are the chances I am scarred for life?”
  • Nice things to have include: a nifty little magnet for pulling lids out of hot water, a nifty little scraper to push the air out of the canned product, and a jar funnel. Everyone should have a jar funnel anyway, they are the best.

The steps are simple:

1. Wash the apples. I fill the sink with water and slosh them around. Don't get carried away and bruise the apples, though.
1. Wash the apples. I fill the sink with water and slosh them around. Don’t get carried away and bruise the apples, though.
Quarter the apples. No need to peel or core.
2. Quarter the apples. No need to peel or core. If you’re using seconds, cut out anything that looks gross or suspect.
Me and my new best friend, the Food Strainer-Saucemaker.
3. Me and my new best friend, the Food Strainer-Saucemaker.
Smushing the cooked apples into the hopper.
4. Smushing the cooked apples into the hopper.
5. Applesauce! Its naturally pink, from the peels.


And there you have it. You can add sugar if you want, I don’t.

To can the applesauce, this is what I do. You should probably use more official instructions:

  1. Heat the applesauce to boiling.
  2. Put the lids in hot, but not boiling, water. This will soften them to promote a good seal.
  3. Ladle the hot, hot, oh-so-hot applesauce into clean, hot canning jars. Leave half an inch of space at the top. This is called “headspace” and it helps jars seal and not explode.
  4. Wipe off any applesauce from the rim of the jars with a towel. Or a paper towel. Whatever.
  5. Put on brand new lids.
  6. Screw on the bands tightly.
  7. Process in a boiling water bath for 20 minutes. This means you put the jars into boiling water with your jar lifter, making sure the water covers them completely, and comes at least one inch over the tops. Once the water returns to boiling, start your 20 minute timer.
  8. After they’ve been in the bath boiling away for 20 minutes, remove from water with jar lifter, and allow to cool. Listen for the satisfying “ping” of the lids sealing.
  9. After 24 hours, if all have sealed, remove the bands.

NOTE: These are “boiling water bath” instructions. You can’t can everything safely via this method. Many foods require a pressure canner. Applesauce can be canned this way because apples are high enough in acid to not promote botulism and other nasties that can thrive in a jar.


French Press Cozy

I have a fondness for coffee.

Okay. Fine. I am addicted. I come from a long line of coffee addicts and pushers. However, I am not really into drip coffee makers. This isn’t from any snobbery, it’s really about anxiety.

If I have a heated electrical appliance, I will convince myself I have left it on when I’ve left the house. See also: curling irons, clothes irons, electric stoves, etc.  Using a French press allows me to make my coffee and then not spend the rest of the day quietly panicking about burning down the apartment building.

The French press is also handy because mine is the right size for me, the lone coffee drinker in the household. And, yeah, the coffee is better than drip. However, one thing the French press is not great at is staying hot.

It’s not its fault. It’s made of glass. It has a lot of surface area. It can’t help it. I’d been thinking of making some kind of cozy to insulate it. I was planning on knitting something, but when I saw this adorable felted one, I got inspired. Using old sweater bits for the insulation is genius. Margo at Thrift at Home routinely uses old sweaters to stuff hot pads and the like. I don’t have any old sweaters kicking around at the moment, but I do have a pair of gloves that needs a rework.

Note tiny hand.
Big glove, little hand. According to my sibling, my pinky fingernails are the creepiest part of my teensy hands.

I have kind of tiny hands. These gloves are snuggly and warm, and were a thoughtful gift from a friend. But my hands are significantly small for them, especially after the gloves stretched out over time. Time for a new life!

First things first, I wanted a basic rectangle shape of insulation. So I removed the fingers from the gloves.

Snip!
Snip!

Then I cut open the hand part of each glove on one side, to make a rectangle. One wasn’t quite enough to fit around the press, so I cut the second piece in half.

I stitched them together messily. I just didn’t want them to separate when they were inside the cover. I used this awful lime green embroidery floss because it was sturdy, would show up in pictures, and because it came in a pack, and I have no plans to use it on anything, as I find it visually jarring.

Stitched stuffing!
Like a very messy suture. I promise if I ever have to suture a wound, I will try to be neater.

Next, I raided my scrap stash to find a nice cotton. When my grandmother moved out of her old house, she got rid of a lot of her quilting fabric, but let me go through it first. Consequently, I have a lot of small pieces of cotton, waiting for something to do. I wanted cotton because I am going to spill coffee on this, and want to be able to wash it.

I gave the fabric a quick press, then folded it over the glove piece, wrong side out. I pinned around two of the edges, and pulled out the lining.

Wrong side out!
Wrong side out!

Two quick seams, and I turned it back right side out. I put the lining inside, rolled the open edge and stitched it down. Now I had a puffy rectangle.

Then I made two loops of elastic.

Elastic loops.
Elastic loops.

(Note: I ended up putting in a third one, for added stability). I stitched them on the inside, going forwards and backwards over them a few times to really secure them.

 The basic cozy was now complete! I stitched some ric-rac onto each short edge, for extra cuteness.

At this point, I realized that the insulation was going to try to roll over, and bunch up, and act like a piece of repurposed gloves. I stitched down about an inch and a half from each edge. (Note: Had I done this before finishing the edges, it would have looked much tidier and less lumpy.)

Finished product!

I picked out some red plastic buttons from my button jar. (Jars of buttons can often be found at antique stores, and they usually aren’t very expensive. Then you have all the vintage buttons your heart could desire).  I stitched mine on, buttoned the cozy onto the French press, and voila!

 All told, this project took about an hour. Now I can enjoy a nice warm cup of coffee long into the morning.

Fall Projects

leaves  Mmm… fall, my favorite time of the year. The air is getting crisp, the leaves are starting to change, and I’m getting ready to snuggle in. Every fall, I start feeling crafty and kitchen-y, and ready to try something    ambitious.

This fall, I’m going to…

Try knitting socks. I have successfully knit in the round on a few occasions, and then lost patience. I think I have more patience now. This may be a ridiculous lack of self-awareness.

Make this soup. I do a mean chickpea-noodle, but this marinated tofu recipe is intriguing.

Go to this event.  I received a membership at the Chicago Botanic Gardens for my birthday, and I love to take advantage of it. Just because we’re renting doesn’t mean I can’t stick some spring bulbs in the yard, or in my flower pots on the windowsill.

Make my own laundry soap.  My boyfriend is going to think this is stupid, and as the person who does most of the laundry, he really should get more of a vote. But I want to try it.

Make this jam. Pear doesn’t get enough play in America, I feel. You can get pear ice cream in France, I would like to point out.

Can some applesauce–which I’ve done before. Look for a tutorial coming your way soon.

What are you trying this fall?


Domesticity Has No Gender

When we talk about “domesticity” there is a general cultural assumption that we’re talking about women. Obviously, the home has been the female domain for much of history. However, I think home is for everybody.

It is never my assumption that cooking, crafting, vintage fashion, or entertaining are just for women. There is room for everyone at my house.

With women now an accepted part of the workforce, men doing housework isn’t the unheard of idea it used to be. But, I would argue, ours is still a culture that is highly invested in policing masculinity and femininity, and that is mostly unprepared to address those who travel between those borders. Just take a look at the commercials on television, and you’ll start to notice just how much comedy hinges on the assumption that husbands are domestic idiots. Home, and the things that happen in it, is still very gendered in the popular imagination.

Studies have suggested that women still do the majority of housework, though men are certainly doing more than they used to. Of course, these studies still divide the human population into a very strict gender binary, which certainly doesn’t include everybody.

Domesticity is what you make of it. My (male) partner is a much better homemaker than I am. If we were the only people living in a society, sociologists would conclude that the male role is to keep the home in order, and the female role is to make things and proposition the male. He keeps on top of laundry, is an organizational whirlwind, and actively thinks of new ways to clean things. He notices clutter, which my eyes tend to bounce over. On the other hand, I freak out a little if the pantry couldn’t keep us through a Laura Ingalls Wilder-style winter. I suffer from the deluded belief that given enough time and semi-appropriate tools, I could figure out how to make anything.None of this has to do with gender. All of this has to do with the people we are, our strengths and what we enjoy.

I think it helps if we think of homemaking as a field that was pioneered by women. Just like other professions and fields were lead by men in the beginning, because they were the only people who were allowed to, the activities of daily life in a home didn’t used to hire men.  And now that we’ve opened up gender roles a little, I can be a physicist and my boyfriend can be a top-notch ironer, or whatever floats our individual and collective boats.

So Retrofitting Vintage isn’t for women or men. It’s for people of all genders or lack of gender, who value home.

Retrofitting Vintage

There’s a lot of good stuff from the past. And a lot of garbage.

Retrofitting Vintage is about taking the good from historical skills based in the home and private world, while ditching the rest. It’s not about romanticizing the past, or getting off the grid, or “old-fashioned values.” It’s about being a radical feminist who knits. A guy who makes cakes. A two mom family that appreciates a trip to the apple orchard. At Retrofitting Vintage we believe that home is for everybody, and that we can bring our own worldviews to traditional tasks. We retrofit them with our own values, taking the good and leaving the rest.